

Docs menuAI carousels
AI carousels
Create your first carousel
Carousel lab is in the left sidebar and builds a carousel in four steps: Topic, Content, Theme and Generate. The first three are free on every plan. Generate draws each slide as an AI image, which needs Creator: 100 a month, with credit packs to top up. This page covers each step, the brand kit, and posting.
8 steps7 min readUpdated
Feature page: Turn a topic into a ready-to-post Instagram carousel
On this page
- Before you start
- 1. Open Carousel lab and set the topic
- 2. Set up your brand kit
- 3. Choose a writing style (optional)
- 4. Edit the outline
- 5. Add your logo and your photo
- 6. Pick a theme
- 7. Generate and fix slides
- 8. Post, schedule or download
- How image credits are spent
- Make a carousel from links
- The CTA slide and your profile card
- Find it again in My carousels
- FAQ
- Related
Before you start
- For the slide images: the Creator plan. Writing the outline and choosing a theme work on every plan.
- To post or schedule from the builder: an Instagram Business or Creator account connected to the workspace. Connect your Instagram account covers that. Downloading the slides needs no connection.
- Optional: your brand colours or brand guidelines PDF, a logo file or your website address, and a clear, front-facing photo of yourself for the cover.
Step 1: Open Carousel lab and set the topic
Click Carousel lab in the left sidebar. Type what the carousel is about in the box at the top, or press Surprise me for a topic from the niches you chose when you signed up.
Under Slides, use − and + to set the total, up to 10. Add a cover slide and Add a CTA slide each take one of those slides. With both off and the count at 1, the post is drawn as a single-page infographic.
Write from a topic is selected at the top. To build the carousel from links you paste instead, choose Curate links; Make a carousel from links, below, covers that route.
- Write from a topic
- Curate links
- Surprise me
- Slides
- Add a cover slide
- Add a CTA slide
Step 2: Set up your brand kit
Brand kit is open under the topic and applies to every slide. On Custom, press + to add a colour and pick it, up to 6. The first colour is used as the background and the second as the text, and a warning appears if the two are below 4.5:1 contrast. Presets has ready-made palettes.
Design system takes a brand guidelines PDF or any image of your brand. It is read in your browser, not uploaded: ReelDrop lists the colours it found on the first four pages ("Tap the colours you want to keep") and, for a PDF, the fonts embedded in it.
Type up to 3 typefaces in Fonts, separated by commas. Press Save palette to keep the palette under Presets, Your palettes, for later carousels; Clear empties the kit, and the theme's own palette is used instead.
- Custom
- Presets
- Design system
- Fonts
- Save palette
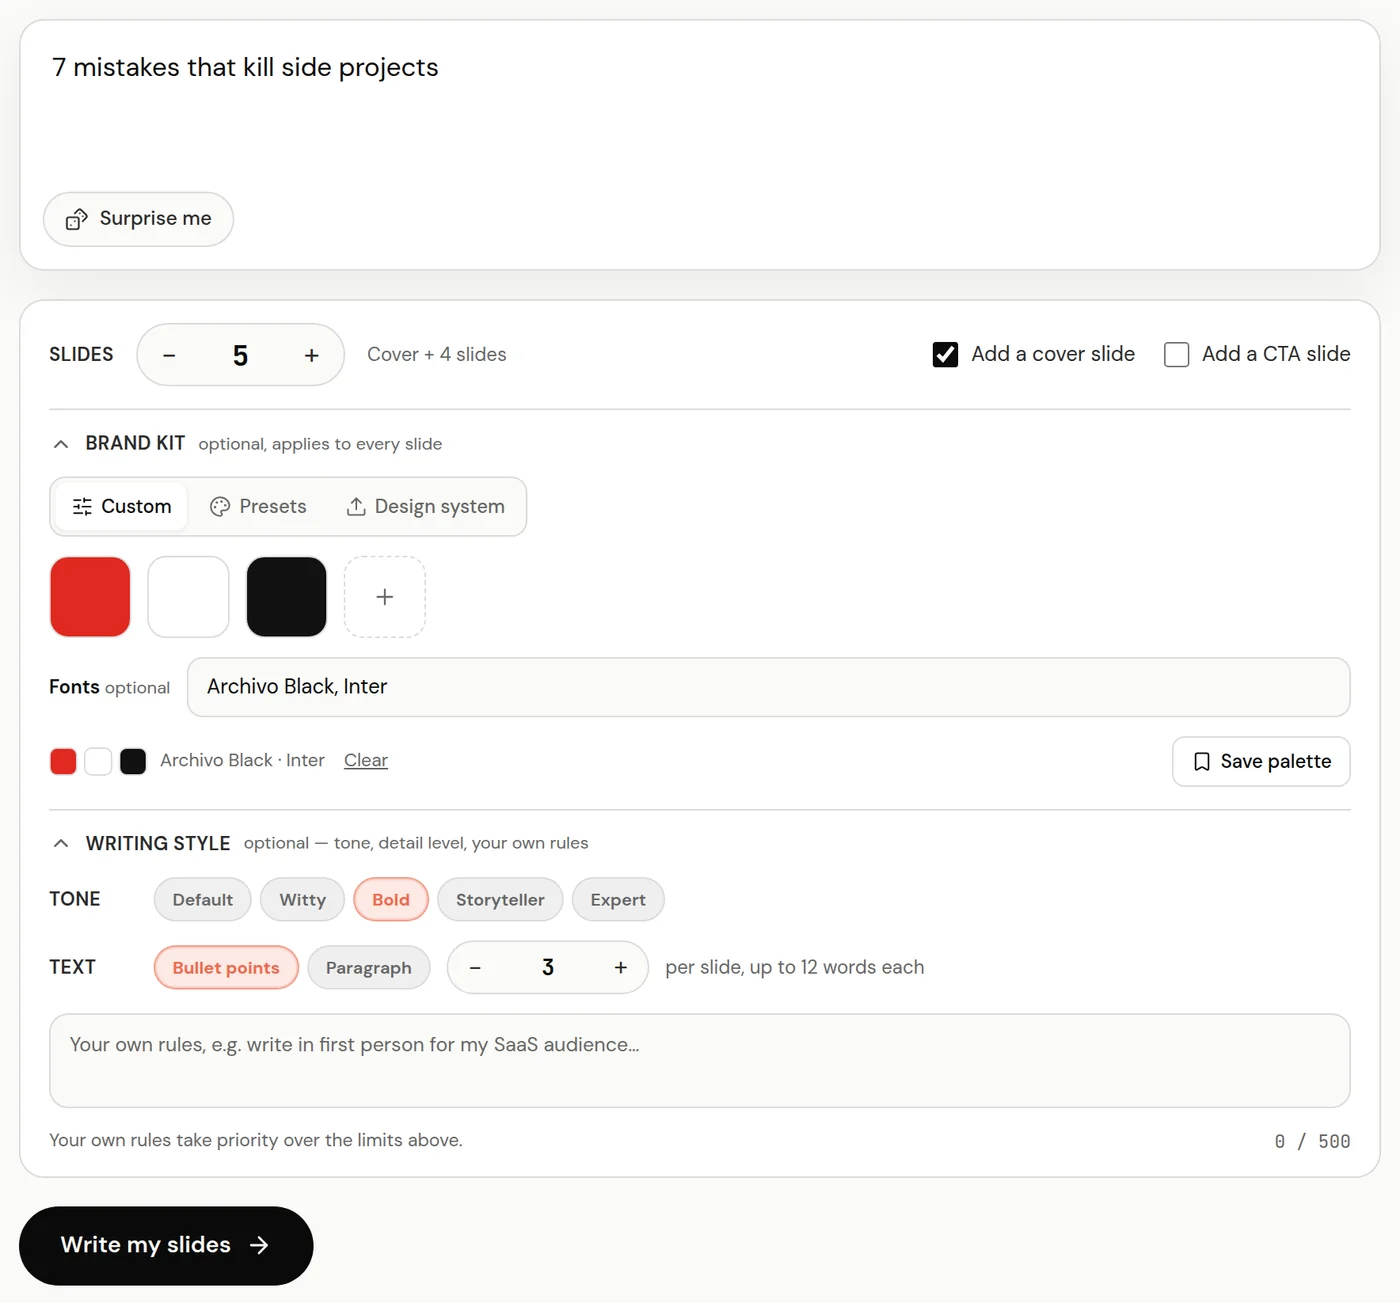
The Topic step, on a demo account. Step 3: Choose a writing style (optional)
Open Writing style. Tone is Default, Witty, Bold, Storyteller or Expert. Under Text, choose Bullet points and set 1 to 6 per slide with − and +, or choose Paragraph. The box below takes your own rules, up to 500 characters, and they take priority over the length limits.
Press Write my slides.
- Writing style
- Tone
- Bullet points
- Paragraph
- Write my slides
Step 4: Edit the outline
The Content step shows every slide as a card under "Slide outlines (edit freely)". Click a title or bullet to rewrite it, use add point for another bullet, and drag a card to move it. Add slide puts a blank slide before the CTA; use its refresh button to have AI write it.
Regenerate this slide rewrites one slide's text. Regenerate with an instruction asks for a one-off instruction first, such as "make this one funnier". None of this uses an image.
To rewrite every slide in a different style, press Restyle all, change the style, tick Keep slide titles if the titles should stay as they are, and press Apply to all slides.
- add point
- Add slide
- Regenerate this slide
- Restyle all
- Keep slide titles
- Apply to all slides
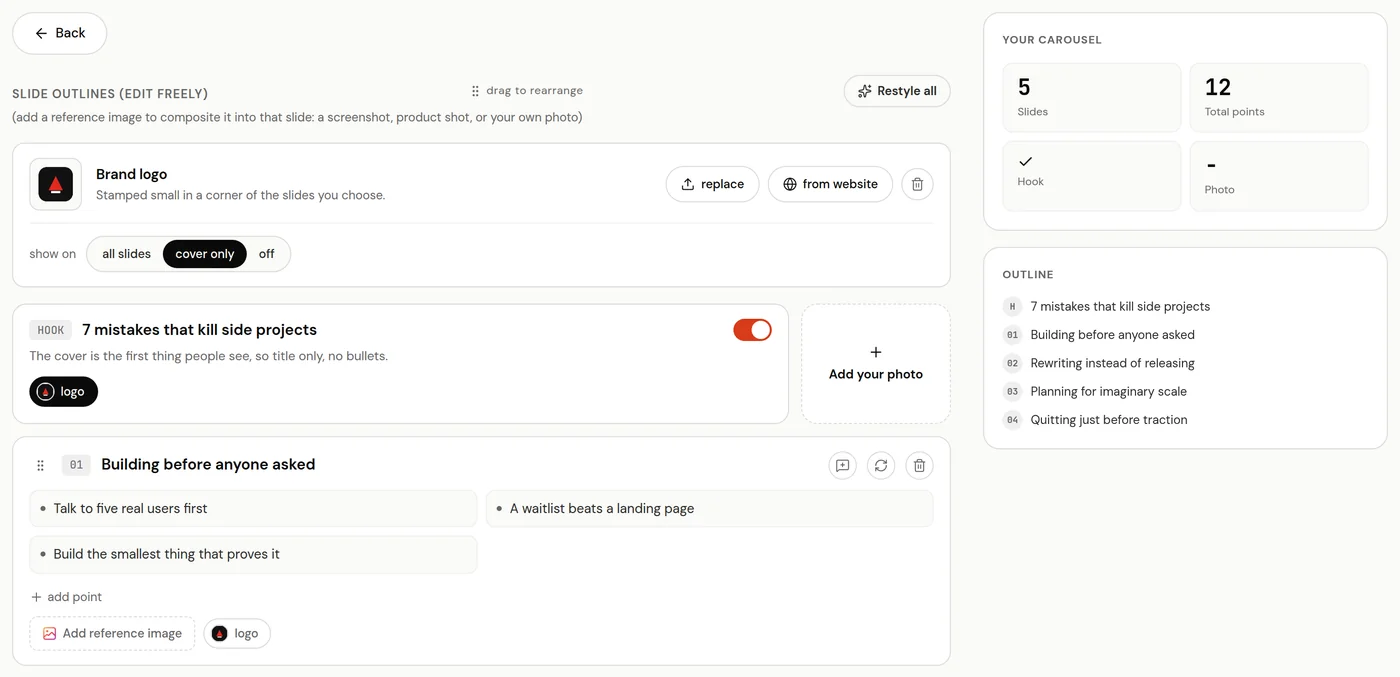
Slide outlines, with the logo bar above them. Step 5: Add your logo and your photo
Above the slides, under Add your product logo, press upload for a PNG, JPG or WebP file, or press from website, type your site's address and press Find logo. Then choose where it goes under show on: all slides, cover only or off. The logo button on each slide card switches it for that slide alone. The logo is kept for the workspace.
On the HOOK card, press Add your photo, then Upload photo. Drag and zoom until your face fills the frame and press Save photo. It becomes the reference for every cover in this workspace until you replace it; Crop & zoom reframes it later. Add reference image on any other slide puts that image into the slide.
- upload
- from website
- Find logo
- show on
- Add your photo
- Save photo
- Add reference image
Step 6: Pick a theme
Press Choose Theme. Theme Library holds all 35 themes by category. Click one to see its sample and what it needs (some need your photo before they will generate), then press Confirm & Create Slides.
Write your own takes a description of the look you want. Upload reference takes up to four images: press Extract theme from reference to see the palette and style notes it found, and Use these colours for my slides to move that palette into your brand kit. On either tab, press Generate Slides.
- Theme Library
- Write your own
- Upload reference
- Confirm & Create Slides
- Generate Slides
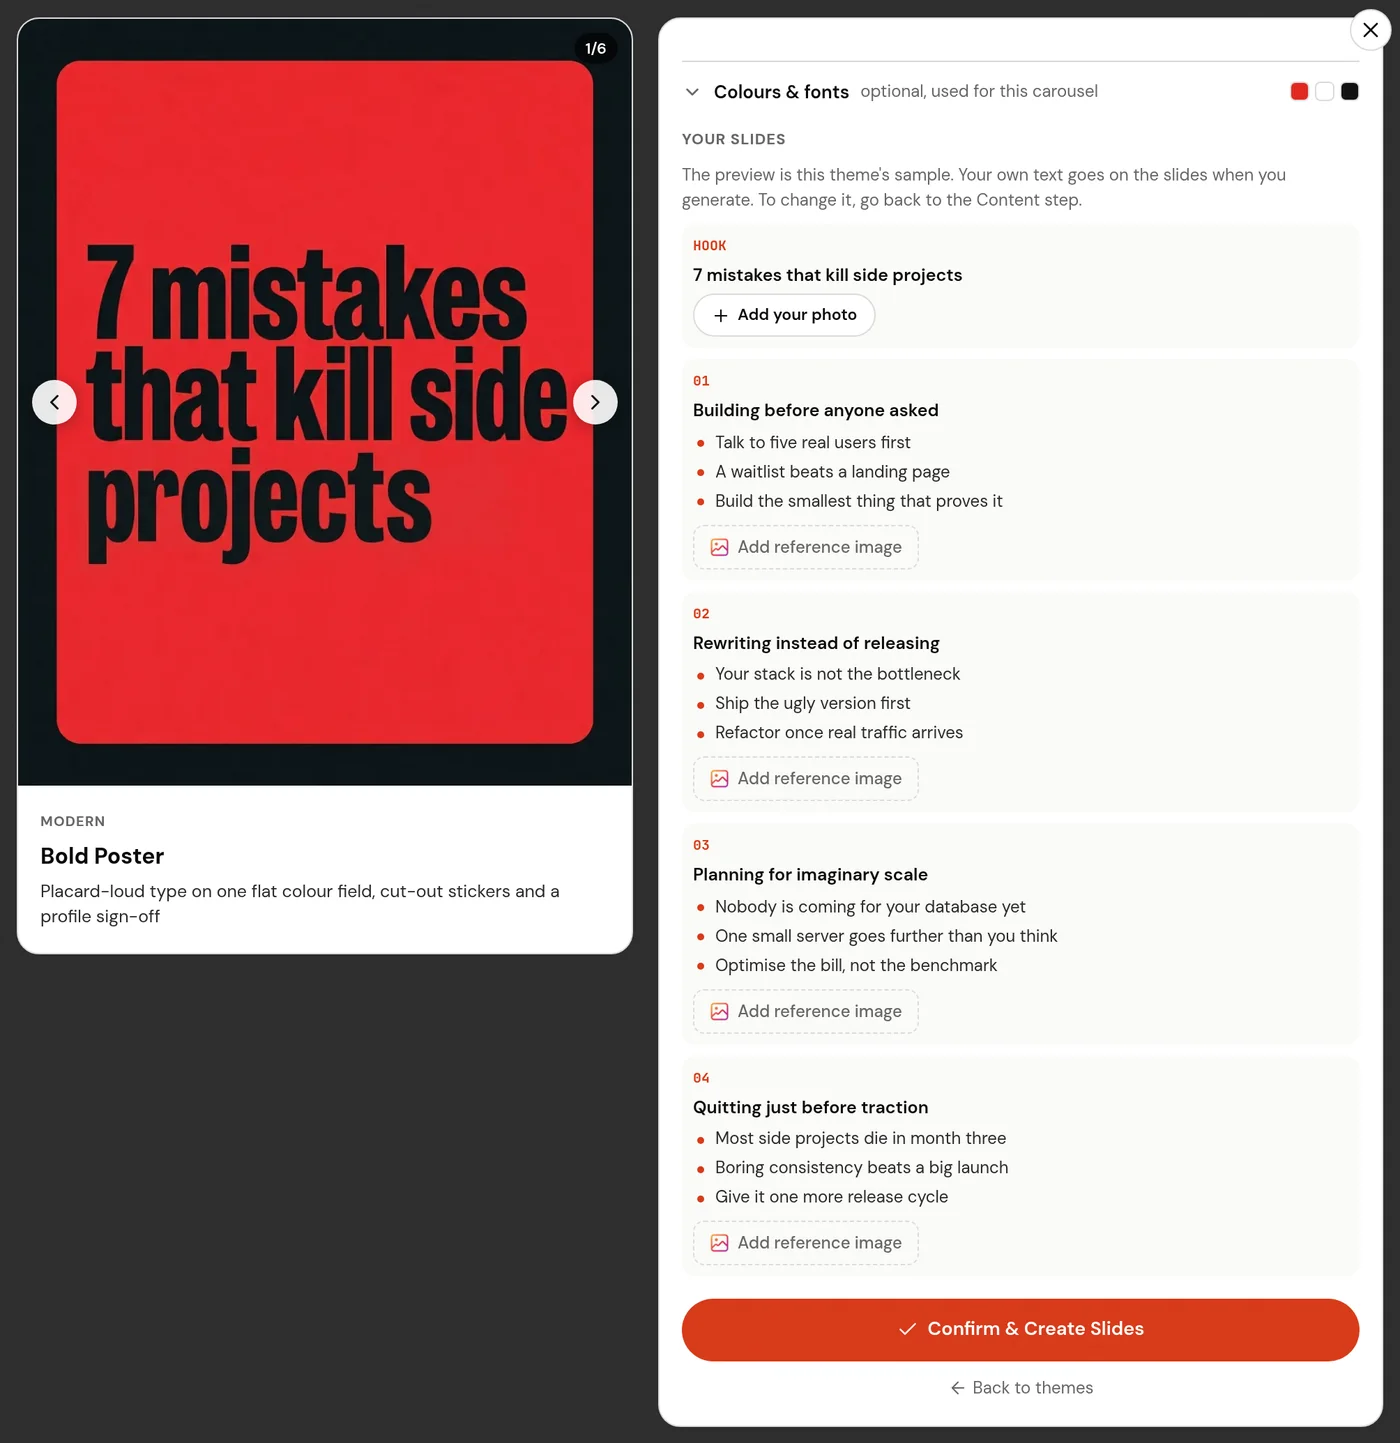
Confirming a theme from the library. Step 7: Generate and fix slides
The slides are drawn one at a time as soon as the step opens; Cancel stops the run. Each finished slide can be clicked while the rest are still being drawn.
In the slide window, Select Region lets you drag a box over the part to fix and describe it under "Describe what to fix in the selected region"; only that area is redrawn. Free Prompt changes the whole slide from "Describe the change for the whole slide". Retry draws the slide again. Undo and Redo move between its versions.
- Cancel
- Select Region
- Free Prompt
- Retry
- Undo
- Redo
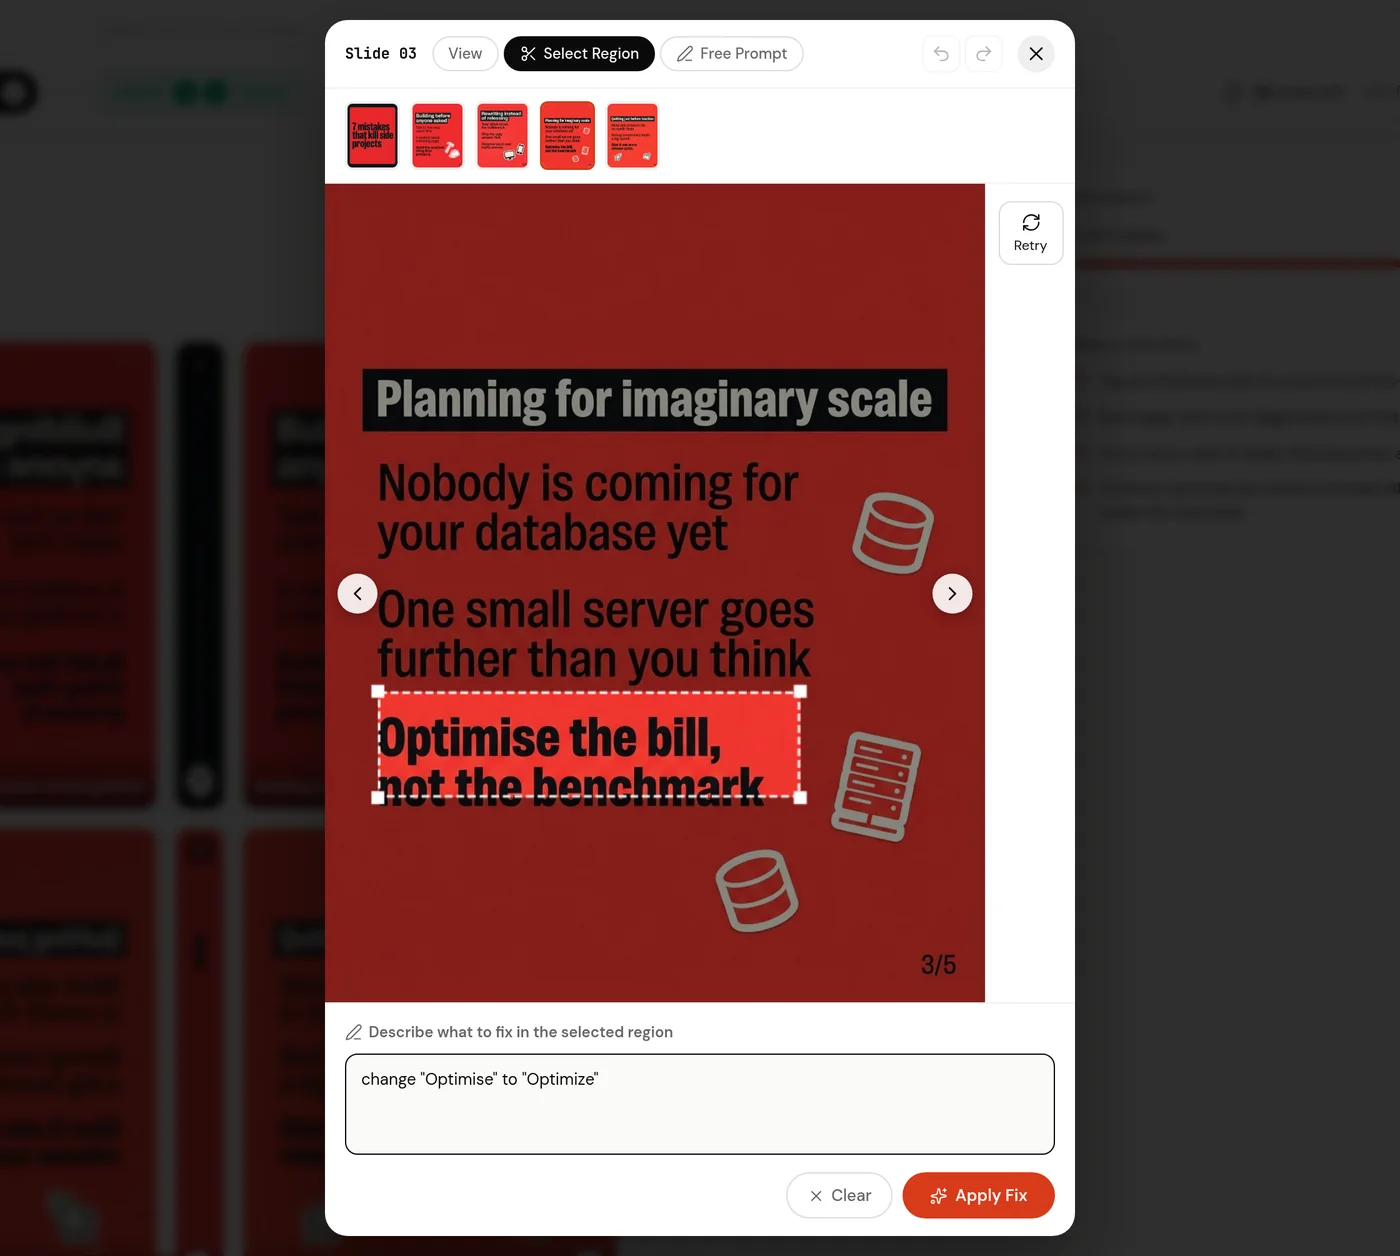
Select Region redraws only the boxed area. Step 8: Post, schedule or download
When every slide is ready, press Post/Schedule. Write a caption, or press Generate captions and pick one of the three; choose up to five hashtags. If the caption asks people to comment a keyword, pick the automation under Attach automation (comment automations on carousels need Influencer or Creator).
Open the timing menu and pick Next Available (your next posting slot), Now, or Set date & time, then press Schedule Post or Publish Now. To keep the files instead, press Download for a ZIP of the slides as JPEGs.
- Post/Schedule
- Generate captions
- Attach automation
- Next Available
- Now
- Set date & time
- Download
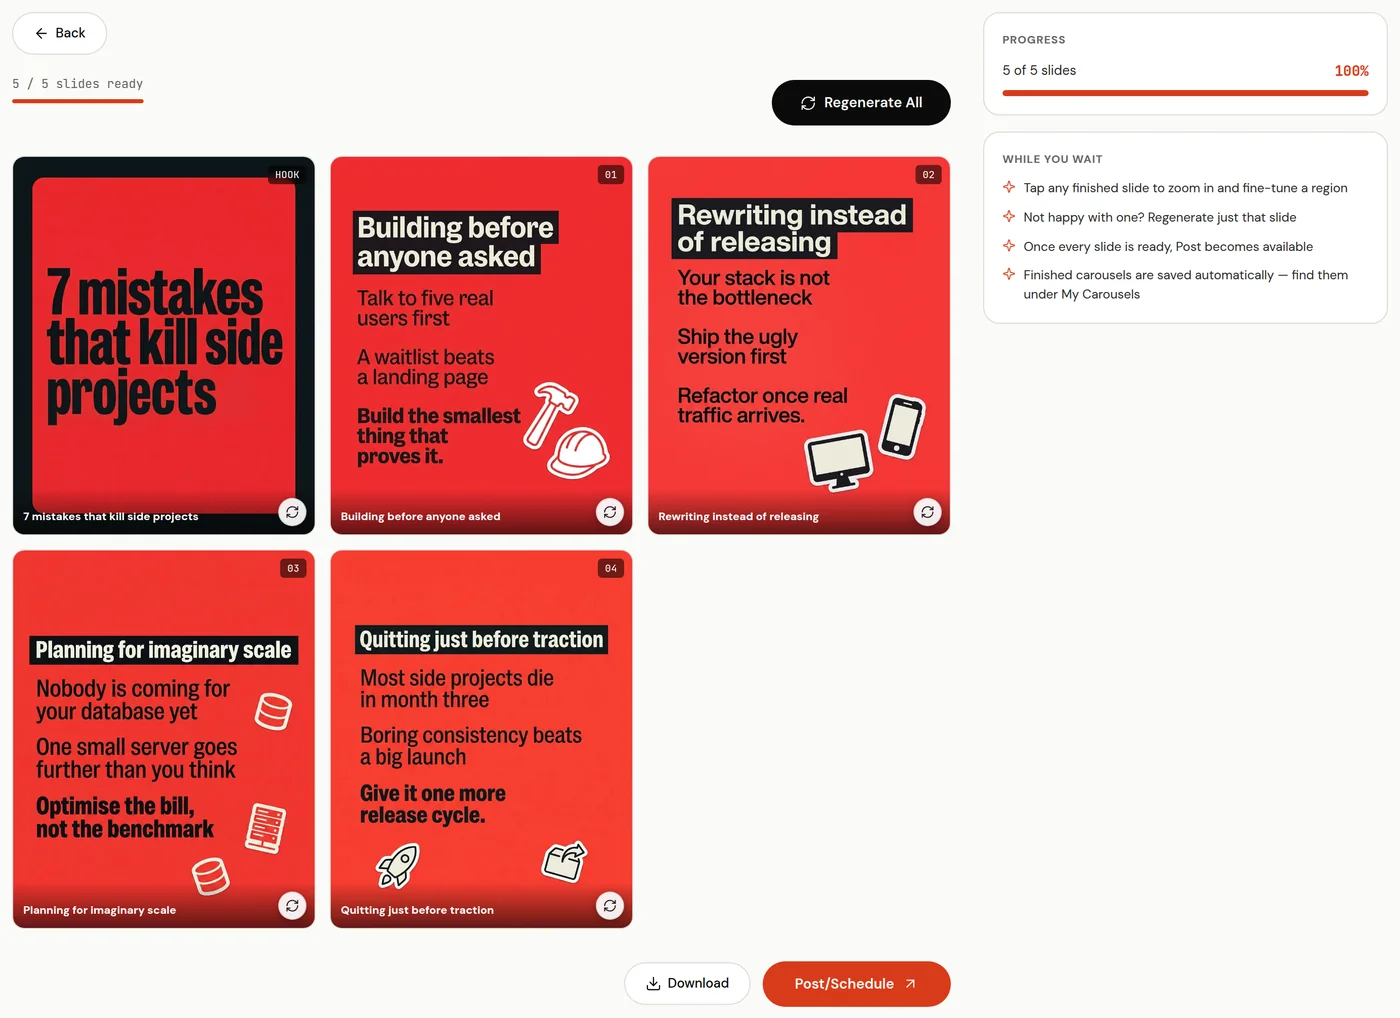
Post/Schedule and Download unlock once every slide is ready.
How image credits are spent
The counter beside the steps shows how many slide images you have left. Writing costs nothing; only drawing does:
- Free: the outline, regenerating a slide's text, Restyle all, choosing or describing a theme, and Extract theme from reference.
- One image generation each: every slide drawn (the cover and the CTA slide included), every Select Region or Free Prompt edit, and every Retry. One that fails is not charged.
- Creator includes 100 a month, shared by every workspace you own and counted in 30-day windows from the first image. Unused ones do not carry over, and AI reel thumbnails use the same pool.
- Credit packs top up Creator's allowance: 50 credits for $5, 200 for $15 or 500 for $30. Press + next to the counter (Get more once you have run out) to buy one. Credits are spent after the monthly allowance and never expire.
- Generate captions in the post step uses a caption generation, not an image.
Make a carousel from links
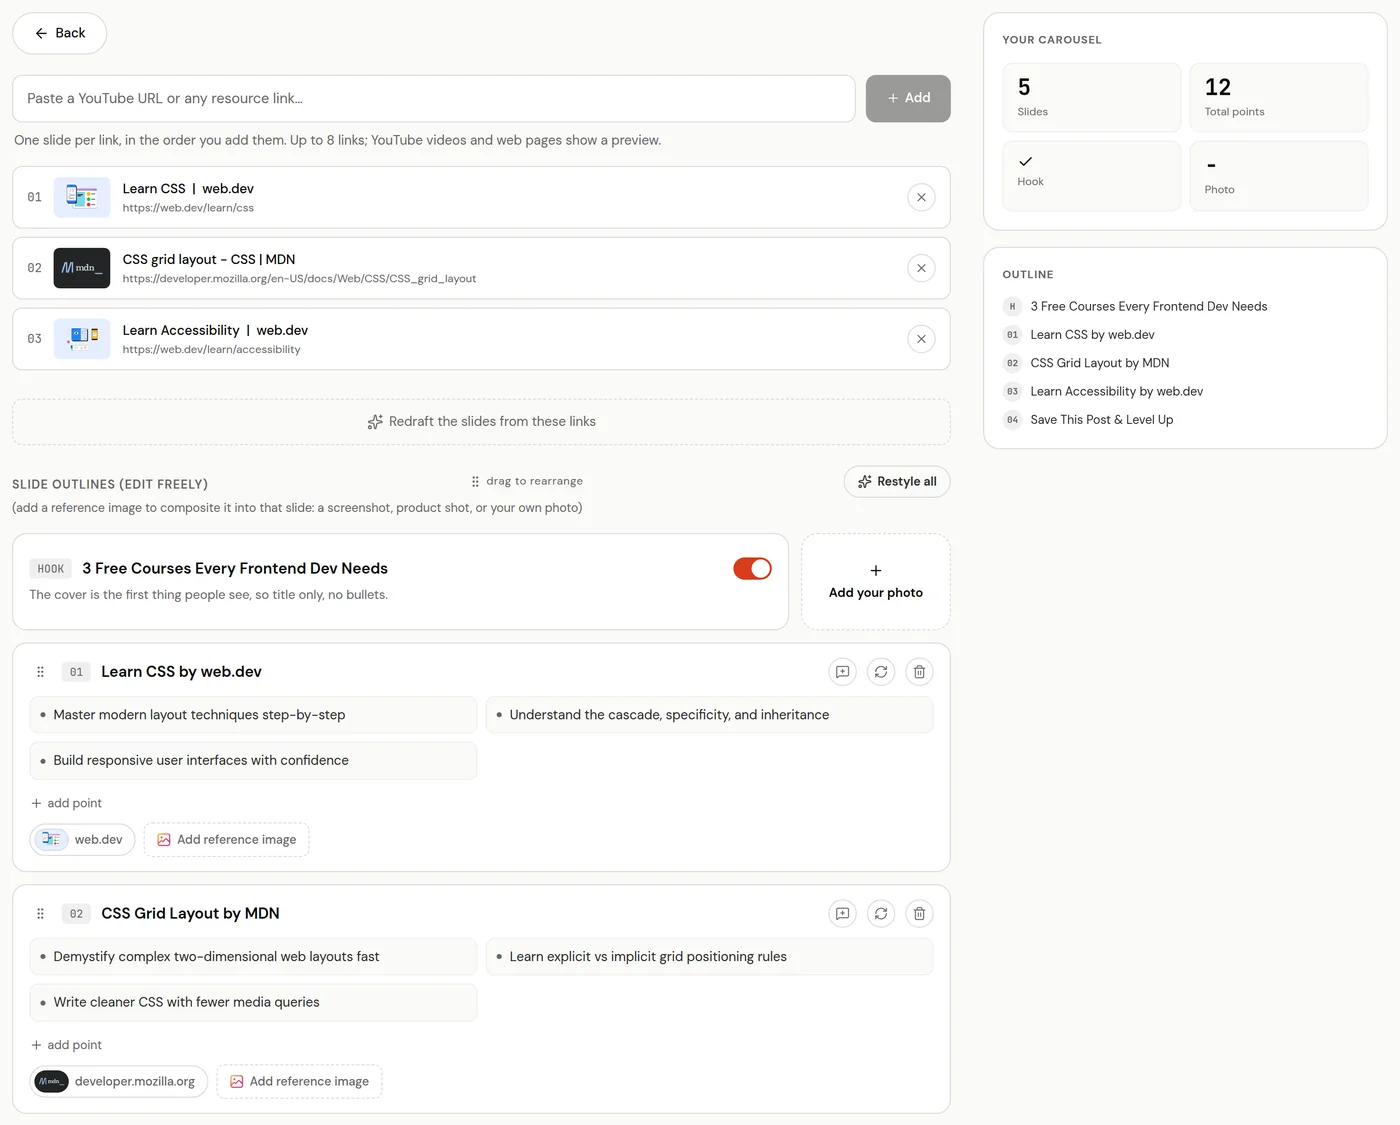
A curated carousel recommends links: one content slide per link, in the order you add them. It takes up to 10 links, or 8 with a cover and a CTA slide.
- On the Topic step, choose Curate links and type the name of the list in the box, such as "3 free courses every frontend developer should bookmark". Press Add my links.
- Paste a link and press Add (or Enter). A YouTube video, Short, playlist or channel shows its title and thumbnail; another page shows the title and image it shares. A link without https:// is fine. Each link is numbered with the slide it becomes; the × removes it.
- Press Write one slide per link. Each slide card shows the link it covers, and the link's preview is used as that slide's image unless you press Add reference image and pick your own.
- Added a link afterwards? Press Redraft the slides from these links. Then Choose Theme and carry on as above; the Lists themes put a rank badge on each item.
The CTA slide and your profile card
Add a CTA slide ends the carousel on a slide asking people to follow you. On the Reading Room theme it is an Instagram profile card: your profile picture, name, @handle and post, follower and following counts, read from your connected account when the slides are drawn. If Instagram does not return the counts, the card has no numbers rather than made-up ones. Several other themes close on your profile picture. On those themes, an image you add to the CTA slide on the Content step is used instead of the profile picture.
Find it again in My carousels
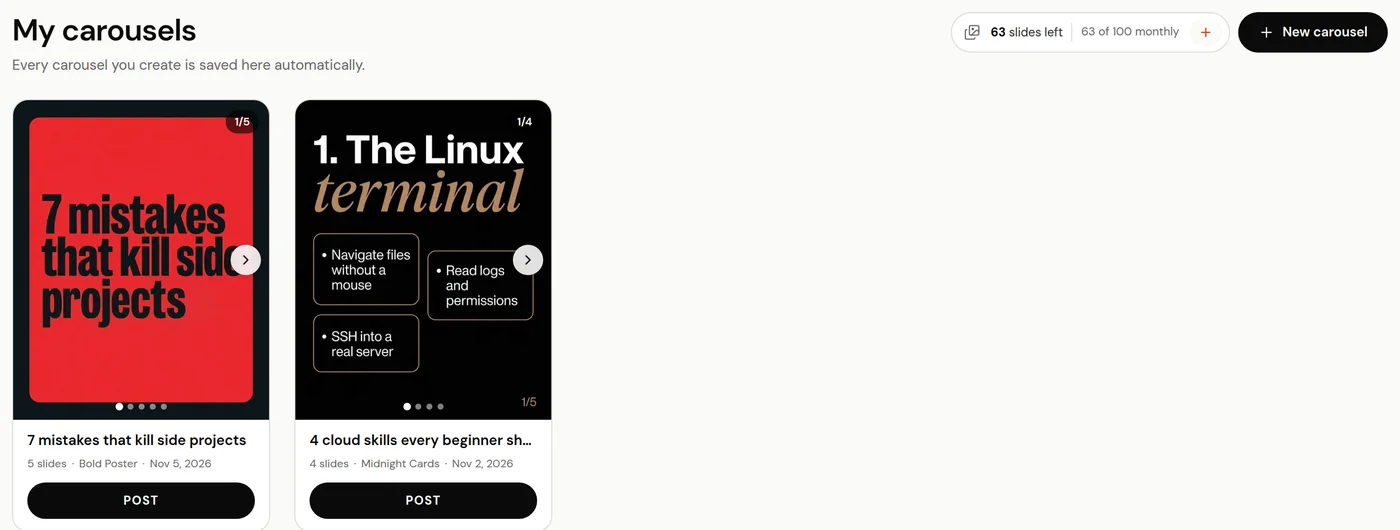
There is no Save button. When the last slide finishes, "Carousel saved to My Carousels" appears, and leaving halfway keeps the slides already drawn. My carousels, at the top of the Carousel lab, lists every saved carousel: Download slides as ZIP, Edit images (Select Region, Free Prompt, Undo and Redo), post, or Delete. Every edited version is kept, so Undo still works after you come back.
The same brand kit is under Settings, Brand kit.
Frequently asked questions
Why does the Generate step say "Carousel image generation is a Creator feature"?
AI slide images are on the Creator plan, and Starter and Influencer include none. Your outline and theme are kept: press Upgrade to Creator, then go Back and continue from the Theme step.
If I go back and change the text or theme, are the slides drawn again?
Yes. Continuing from the Theme step again draws every slide again, and each one uses an image. To change one slide after it is drawn, open it and use Select Region, Free Prompt or Retry instead.
Why does the person on my cover not look like me?
Either no hook photo is set, or the face in it is hard to see. Add a clear, well-lit, front-facing photo with Add your photo on the HOOK card. Sunglasses, a mask or a turned head make the AI guess at the face.
Can I rename a saved carousel?
No. A saved carousel keeps the topic it was made from as its name.
Related
Something here out of date or missing a step? Tell us and we will fix it.
Stop managing Instagram. Start growing with it.
Sign up free for AI carousels, DM automation, captions, and scheduling: built for creators who post less and grow more.
Built in Toronto by Piyush Sachdeva.